Saturday, April 25, 2015

Swing set under $100


Supplies: 

2- 4x4x12' pretreated wood beams cut in half so - 4 4x4x6' beams
(I made a toddler swing set - for regular size use 4x4x8' beams)
1- 4x4x8' pretreated wood beam
1- 2x4x8' pretreated wood beam
Swing Hardware 
40 - 2" wood screws 
4 - 3" wood screws


Step 1: Attach braces to 6' beams


Lay out 6' beams and aline the brace at the top...


Screw into place...


Flip over and do the same to the other side.


Step 2: Create side supports

Measure 2x4x8' beam for side supports...


Cut beams to the same size.


Step 3: Attach upper beam.


If working alone, flip a-frame over and attach upper beam upside-down.


Step 4: Attach swings

I found it easier to attach swings before standing it up.
(this is for shorties)


Step 5: Attach side beam
(use a level if you want it straight - I clearly don't care :)

Use 3" screws to attach on either end.
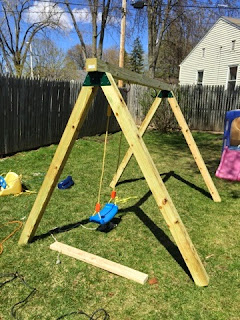


And Done.


I will be painting it too... picture to come!


Side note: you will want to add 2 of these braces for extra strength... I will be doing this soon!

Monday, March 16, 2015

$10 wall activities


Felt board

You'll need: 
Frame, fleece or felt fabric to cover the face of your frame


Step 1: Cut fabric 1 inch larger than your frame.


Step 2: Tuck fabric into frame 
(You can use a picture frame and just leave the glass out)


Step 3: Adhere to wall with Velcro.


I added a tray for storage!


Magnet Board


You'll need:
Sheet of metal, contact paper and Industrial strength Velcro.


Step 1: Cover sharp edges of metal with contact paper.
(Gluing ribbon or fabric around edges would work too. You could 
also place the metal sheet inside of a picture frame -without the glass)


It works best if you place the strip of contact paper over front edge of your metal sheet. 
Then cut a square out of the corner of the contact paper and fold the edges over.


Step 3: Secure to the wall with Velcro. 


Friday, February 28, 2014

Easy Kitchen Chair Restore


Let's make this chair worth sitting in!


Step 1: Remove seat 
(there should be four screws underneath)


Step 2: Sand entire chair


Step 3: Prime entire chair
(Use a good primer! It may cost more, 
but it will be worth the money!)


Step 4: Wrap fabric around
seat and
staple into the bottom side.

Step 5: Wrap plastic around seat and 
staple into the bottom side  


Step 6: Secure the seat to the chair frame. 


Perfection!


Friday, August 23, 2013

Dress up a card table


Step 1: Trace around the top of your chair onto paper to create your template.


Step 2: Cut out 8 pieces of fabric (for 4 chairs)


Step 3: Place fabric wrong side out and sew along the top and sides. 


Step 4: Roll bottom edge twice and iron.


Step 5: Sew all the way around the bottom hem.


Step 6: Turn right side out. Make sure your corners are even. 


Step 7: Iron one last time. Slip over chair! 


You can also make a table cloth.


Step 1: Measure your table and cut the fabric two feet longer in both directions.


Step 2: Fold all eges in twice and iron.


Step 3: Sew all the way around the hem. And your done!!

(Finished picture to follow)