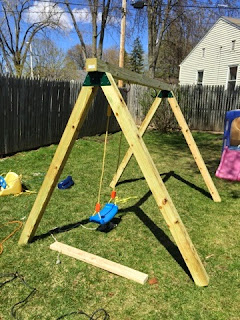
Supplies:
2- 4x4x12' pretreated wood beams cut in half so - 4 4x4x6' beams
(I made a toddler swing set - for regular size use 4x4x8' beams)
1- 4x4x8' pretreated wood beam
1- 2x4x8' pretreated wood beam
Swing Hardware
40 - 2" wood screws
4 - 3" wood screws
![](https://blogger.googleusercontent.com/img/b/R29vZ2xl/AVvXsEigXtg1KCZbKV33gmRQRXalDnQMevw2eqIQuTmf4cjbMVf7IQDxSmVEik0gjMVyLSqAHFPSXWeebr41YRMZ6C1v5Q7qQH8zj28E5krXGxAs1RyAsVLZkSBrqP86V7kGPQs0f9ZkD3Qk7Sg/s640/blogger-image--722408138.jpg)
Step 1: Attach braces to 6' beams
Lay out 6' beams and aline the brace at the top...
![](https://blogger.googleusercontent.com/img/b/R29vZ2xl/AVvXsEhj3OaLlwVw0VfW6TQJfPJxm5zi4F-dh6eQxMKWyJX7lfjdO8r_1K0bnb43mY8I9T2GATC-fm0RJmHdcl7sNzvtY3_WDmHOJqTJrBhpWYk29m4MvIg-zhm1ILVhpoHXMBR_leoqkeCrORU/s640/blogger-image--667056096.jpg)
Screw into place...
Flip over and do the same to the other side.
Step 2: Create side supports
Measure 2x4x8' beam for side supports...
Cut beams to the same size.
![](https://blogger.googleusercontent.com/img/b/R29vZ2xl/AVvXsEgdQvwfjusZqzjC9JW1QUVhj4WHR9WrKpbfPKraCncVivjnQKp83hddmTnXV_fAhYmBkR1FEmcuow1GoXsQwnJhWuiEhP4MqlopkfrPkXN9a7ewncNM3KmUCfiQUNpPnkUP5fcAeCmQCpU/s640/blogger-image-1733298378.jpg)
Step 3: Attach upper beam.
If working alone, flip a-frame over and attach upper beam upside-down.
![](https://blogger.googleusercontent.com/img/b/R29vZ2xl/AVvXsEgZzgsm6irNm-gY9bTieNfnyRLEfEJnelqXVDBFqXZcPTGWhcjLJuPduyfn-5bMLNzlOFe4G7sexLw7lkSyrVAQinqgXLW8PN7qL5fHbsAQiuXYCw9aA7o2GPBzRkNL6EeYmOYCnzORCjY/s640/blogger-image-1322984354.jpg)
![](https://blogger.googleusercontent.com/img/b/R29vZ2xl/AVvXsEiI-Os87YrmycWrhc4Q9aKW9MIDe5EACbGASyJ9bQHT2cFCitIhPX9qMwLX0zF4Xv6VJTZRiXPkzLD3w5nLmPSz1OA_btw3PRXREQ0ccrlLr9Mbgrv00YGkwB5eAg4GSIllWRjGD1a7QX8/s640/blogger-image--227506975.jpg)
Step 4: Attach swings
I found it easier to attach swings before standing it up.
(this is for shorties)
![](https://blogger.googleusercontent.com/img/b/R29vZ2xl/AVvXsEjfjTqSFM54SiDF7IgcyGrCcB523dr8y5wNOWQiufgzv7g3vFUmHJZXj4fqONX_nGWzHNln7thPmvUMN-wWF3cAgZVjH7q4mySTGPxjgAqryovQGHHtnJkYj4JNUTbhJoFPuppUhfDPJXk/s640/blogger-image-1707162395.jpg)
Step 5: Attach side beam
(use a level if you want it straight - I clearly don't care :)
Use 3" screws to attach on either end.
And Done.
![](https://blogger.googleusercontent.com/img/b/R29vZ2xl/AVvXsEgkIDjZjWRbQoHJnmM98mAAcXUosnnFhz9d8qV5AkTLjFsgGNaSEUIxsIyq1bgAJ9I8xNjP5_HSG96fSVIBnkXlhRziKcw3IaJlWOJWUS5iqDdMB5XLUTIOTuZrR7zUcVmATVkngSdHzVc/s640/blogger-image-1215021025.jpg)
I will be painting it too... picture to come!
![](https://blogger.googleusercontent.com/img/b/R29vZ2xl/AVvXsEhMm4xWq5OcHAC4YqpxPKR16ZLKhvOSTj4tH4r4w3jR3ZpBUjevy9-kP44e06JJE7vjzjHAY0UbOHH7wqWUMNgcKi_vgl7oqwrsV3ejX1-euCAdQOLjbdqmeSZsl0WWOuJ9JAaOeky0t_w/s640/blogger-image--456914204.jpg)
Side note: you will want to add 2 of these braces for extra strength... I will be doing this soon!
No comments:
Post a Comment